Sunday, October 20, 2013

CI Based WebService from PeopleSoft to 3rd Party System

CI Based WebService from PeopleSoft to 3rd Party System


CI Based Web Service

In this example we will create a web service in PeopleSoft based on a component interface which will be then consumed by a third party system.

Step 1 –Create a Component in PeopleSoft System.

We have created a simple page and component based on which we will create out component interface.


Create a component interface based on this component.


Step 2 – Create Service and Service Operation based on the component interface.


Select the service operations that you want to give access to.


Now, the service operations are created for Get and Create methods.


Step 3 – Provide security to the generated service operations.


Click on the link Service Operation Security and assign permission list to it and give full access.

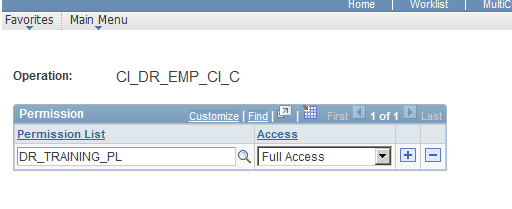


Step 4 – Create web service based on the above generated service.


Step 5 – View the request templates.


<?xml version="1.0"?>
<soapenv:Envelope xmlns:soapenc="http://schemas.xmlsoap.org/soap/encoding/" xmlns:soapenv="http://schemas.xmlsoap.org/soap/envelope/" xmlns:wsa="http://schemas.xmlsoap.org/ws/2003/03/addressing/" xmlns:xsd="http://www.w3.org/2001/XMLSchema/" xmlns:xsi="http://www.w3.org/2001/XMLSchema-instance/">
  <soapenv:Header xmlns:soapenv="http://schemas.xmlsoap.org/soap/envelope/">
    <wsse:Security soap:mustUnderstand="1" xmlns:soap="http://schemas.xmlsoap.org/wsdl/soap/" xmlns:wsse="http://docs.oasis-open.org/wss/2004/01/oasis-200401-wss-wssecurity-secext-1.0.xsd">
      <wsse:UsernameToken>
        <wsse:Password>PTDMO</wsse:Password>
      </wsse:UsernameToken>
    </wsse:Security>
  </soapenv:Header>
  <soapenv:Body xmlns:soapenv="http://schemas.xmlsoap.org/soap/envelope/">
    <Get__CompIntfc__DR_EMP_CI xmlns="http://xmlns.oracle.com/Enterprise/Tools/schemas/M648264.V1">
      <EMPLID>XYZ</EMPLID>
    </Get__CompIntfc__DR_EMP_CI>
  </soapenv:Body>
</soapenv:Envelope>


Sample Create Request

<?xml version="1.0"?>
<soapenv:Envelope xmlns:soapenc="http://schemas.xmlsoap.org/soap/encoding/" xmlns:soapenv="http://schemas.xmlsoap.org/soap/envelope/" xmlns:wsa="http://schemas.xmlsoap.org/ws/2003/03/addressing/" xmlns:xsd="http://www.w3.org/2001/XMLSchema/" xmlns:xsi="http://www.w3.org/2001/XMLSchema-instance/">
  <soapenv:Header xmlns:soapenv="http://schemas.xmlsoap.org/soap/envelope/">
    <wsse:Security soap:mustUnderstand="1" xmlns:soap="http://schemas.xmlsoap.org/wsdl/soap/" xmlns:wsse="http://docs.oasis-open.org/wss/2004/01/oasis-200401-wss-wssecurity-secext-1.0.xsd">
      <wsse:UsernameToken>
        <wsse:Password>PTDMO</wsse:Password>
      </wsse:UsernameToken>
    </wsse:Security>
  </soapenv:Header>
  <soapenv:Body xmlns:soapenv="http://schemas.xmlsoap.org/soap/envelope/">
    <Create__CompIntfc__DR_EMP_CI xmlns="http://xmlns.oracle.com/Enterprise/Tools/schemas/M1052695.V1">
      <EMPLID>XYZ</EMPLID>
      <NAME>XYZ</NAME>
    </Create__CompIntfc__DR_EMP_CI>
  </soapenv:Body>
</soapenv:Envelope>


Step 6 – Test the web service

Here, we are using SOAP UI tester.

Create a new project.


Give a project name and provide the above generated WSDL.


Click on Request 1 of Employee Get. Here we will get the employee name of the employee identified by tag EMPLID.


In the response message we can see the fetched employee name.


Now, access Create Operation


We will insert a new employee id 7.


Response Message


Here, we can confirm that the employee id was successfully inserted.


Peoplesoft - XML Publisher

XML Publisher in PeopleSoft


XML Publisher

What is XML Publisher?

XML publisher is a reporting tool.

How does it works?

Data logic is different is separated from layout, so that the same set of data is used in different ways.


Steps
i.                     Set up XML Publisher
ii.                   Provide security
iii.                  Register data sources
iv.                 Create Templates
v.                   Create Reports and attach templates
vi.                 Run and view the reports

Setup XML Publisher
i.                     First, install the design helper from Reporting Tools àXML Publisher àSetup à Design Helper
This will help in creating rtf templates to be attached with report.


Pre requisite – jre 6.21 32 bit (minimum version)

Once the design helper is installed we can view it under the Add Ins in Word.


ii.                   Before creating any report, create a report category to provide security to the report.


For example, if we want to create compensation reports, then we can create category compensation
and assign the role / users to it that can view or run the report.


Register Data Sources
The next step is to register the data sources. Data sources are entities that will hold the logic to retrieve the data to be displayed on the report.

There are three types of data sources that are available in PeopleTools 8.51 viz. XML File, Connected Query and PS Query. Prior to 8.50 the available data sources were – PS Query, XML File, XML Docset, Rowset. Rowset and XMLDocset are deprecated now and are available only for backward compatibility.

Create Layout
Now, we will create report layout which will define how our report will look like. We can design the templates through rtf in MS Word, PDF and XSL.

Create Report
Now, we will define the report where we will attach the data source, template and output.

 Creating XML Publisher Report using PS Query through

1.      Create PS Query

We have created a simple PS Query DR_XMLPUB_QRY which prompts for an employee id and  displays the output from NAMES table.


2.       Create Data Source
Now, we will create a data source.
Navigate to Reporting Tools à XML Publisher à Data Source


Generate the Sample Data File.


Save the changes.

What ever data source we use it gets converted into xml format internally. So, best performance use the xml file as data source.

3.       Create Template

Save the above generated XML.

Now, open MS Word.

Go To Add-Ins à Data à Load XML Data


Select the above XML File and we will get the following message.


Now, we will generate the template using uploaded xml file.


  Select all the columns except @rownumber.


Here, we have select EMPLID as the field on which grouping will be done.


Enter valid column labels.


Finally the template is generated.


Save the template.


4.       Create Report

Now, we will create the report where we will attach the above create template and we will provide the output options.

Navigate to Reporting Tools à XML Publisher à Report Definition

Add a new value


Click on the Template Tab and upload the above created template.


Click the Output tab and select PDF as output.


Now, save the report.

5.       Run the Report
There are two ways to run XML Publisher report which is based on PS Query. They can be run through PIA (Query Report Viewer) as shown below or can be through PeopleCode.

a.       Through Query Report Viewer

Navigate to Reporting Tools à XML Publisher à Query Report Viewer

Open the above create report.


               Now, click on view report.


b.      Through PeopleCode
  
On the PIA, create a page with a text box and a push button.

On the FieldChange event write the following peoplecode.


Enter the employee id and click on Generate Report.


Using XML File as Data Source

Create Data Source


Create Template

Before template creation we need to have a xml file unlike case of PS Query as data source where we can generate the PIA from PIA itself.

Following is the code to generate the xml file from rowset.


We can see that under C:\temp both the xml and xsd files have been generated.


Now, create the template by uploading the above generated xml file.


Create Report

Create a new report and select XML file as data source.


Save the changes.

Run the Report

Since this a XML file based report so it can’t be viewed from Query Report Viewer as it was case with PS Query.

So, we have to write peoplecode to view the xmlp reports based on xml file as data source.


View the report on PIA.


Performance wise using XML file data source is better option. It is also helpful to easily develop reports based on parent-child relationship or to implement complex logic to fetch the data.

XML -

This will generate an XML error:
<message>if salary < 1000 then</message>
To avoid this error, replace the "<" character with an entity reference:
<message>if salary &lt; 1000 then</message>
There are 5 predefined entity references in XML:
&lt;<less than
&gt;>greater than
&amp;&ampersand 
&apos;'apostrophe
&quot;"quotation mark

Saturday, October 19, 2013

Dynamic Prompt - with Dynaic view

in every field change write criteria Function -

Declare Function Build_WhereClause PeopleCode MHN_PENDDOC_REC.EMPLID FieldFormula;

Build_WhereClause();

Where Clause Function : in EMPLID field formula

Function Build_WhereClause
   
   Local string &where_clause, &sql1;
   
   If All(MHN_PENDDOC_REC.INSTITUTION.Value) Then
      &where_clause = &where_clause | "INSTITUTION='" | MHN_PENDDOC_REC.INSTITUTION.Value | "' ";
   End-If;
   
   If All(MHN_PENDDOC_REC.ACAD_CAREER.Value) Then
      &where_clause = &where_clause | "AND ACAD_CAREER='" | MHN_PENDDOC_REC.ACAD_CAREER.Value | "' ";
   End-If;
   
   If All(MHN_PENDDOC_REC.STRM.Value) Then
      &where_clause = &where_clause | "AND STRM='" | MHN_PENDDOC_REC.STRM.Value | "' ";
   End-If;
   
   If All(MHN_PENDDOC_REC.CAMPUS.Value) Then
      &where_clause = &where_clause | "AND CAMPUS='" | MHN_PENDDOC_REC.CAMPUS.Value | "' ";
   End-If;
   
   If All(MHN_PENDDOC_REC.ACAD_PLAN.Value) Then
      &where_clause = &where_clause | "AND ACAD_PLAN='" | MHN_PENDDOC_REC.ACAD_PLAN.Value | "' ";
   End-If;
   
   If All(MHN_PENDDOC_REC.CLASS_SECTION.Value) Then
      &where_clause = &where_clause | "AND CLASS_SECTION='" | MHN_PENDDOC_REC.CLASS_SECTION.Value | "' ";
   End-If;
   
   If All(MHN_PENDDOC_REC.ADMIT_TYPE.Value) Then
      &where_clause = &where_clause | "AND ADMIT_TYPE='" | MHN_PENDDOC_REC.ADMIT_TYPE.Value | "' ";
   End-If;
   rem WinMessage(&where_clause);
   If Left(&where_clause, 3) = "AND" Then
      &where_clause = Replace(&where_clause, 1, 3, "");
   End-If;
   If All(&where_clause) Then
      &where_clause = "WHERE" | &where_clause;
   End-If;
   &sql1 = " SELECT DISTINCT EMPLID,NAME FROM PS_MHN_XML_EMP4_VW " | &where_clause;
   
   
   MHN_PENDDOC_REC.EMPLID.SqlText = &sql1;
End-Function;

in EMPLID Rowinit

MHN_PENDDOC_REC.EMPLID.SqlText = "SELECT DISTINCT EMPLID, NAME  FROM PS_MHN_XML_EMP4_VW";

Dynamic Grid -


 &SQLString = "SELECT A.COMMON_ID,  C.NAME,A.CHECKLIST_CD, D.XLATLONGNAME FROM PS_PERSON_CHECKLST A, PS_NAMES C, PSXLATITEM D WHERE A.CHECKLIST_STATUS = 'I'  AND C.EFFDT = (SELECT MAX(C_ED.EFFDT) FROM PS_NAMES C_ED WHERE C.EMPLID = C_ED.EMPLID AND C.NAME_TYPE = C_ED.NAME_TYPE AND NAME_TYPE='PRI' AND C_ED.EFFDT <= SYSDATE) AND A.COMMON_ID = C.EMPLID AND  D.fieldname = 'CHECKLIST_STATUS' AND D.FIELDVALUE = A.CHECKLIST_STATUS AND A.COMMON_ID IN (SELECT HM.EMPLID FROM PS_MHN_PENDDOC_VW HM) ";
       
&sql1 = CreateSQL(&SQLString);
             
 &rsStep = GetLevel0()(1).GetRowset(Scroll.MHN_PENDOC_TBL);
 &rsStep.Flush();
 &gridrow_i = 0;
While &sql1.Fetch(&HM_COMMON_ID, &HM_NAME, &HM_DESCR, &HM_XLATLONGNAME)
                  
&gridrow_i = &gridrow_i + 1;
&rsStep.InsertRow(&gridrow_i);
&rsStep(&gridrow_i).MHN_PENDOC_TBL.OPRID.Value = %OperatorId;
SQLExec("SELECT A.NAME FROM PS_PERSON_NAME A,psoprdefn B WHERE A.EMPLID = B.EMPLID AND NAME_TYPE = 'PRI' AND B.OPRID = :1", %OperatorId, &HM_OPR_NAME);
&rsStep(&gridrow_i).MHN_PENDOC_TBL.GetField(Field.NAME).Value = &HM_OPR_NAME;
 &rsStep(&gridrow_i).MHN_PENDOC_TBL.EMPLID.Value = &HM_COMMON_ID;
 &rsStep(&gridrow_i).MHN_PENDOC_TBL.FULL_NAME.Value = &HM_NAME;
 &rsStep(&gridrow_i).MHN_PENDOC_TBL.DESCR.Value = &HM_DESCR;
 &rsStep(&gridrow_i).MHN_PENDOC_TBL.XLATLONGNAME.Value = &HM_XLATLONGNAME;
SQLExec("SELECT DESCR,CLASS_SECTION,EXPIRATION_DATE,DESCR1,NATIONAL_ID FROM PS_MHN_PENDDOC_VW WHERE EMPLID = :1 AND ROWNUM = 1", &HM_COMMON_ID, &HM_PT_DESCR, &HM_PT_CLASS_SECTION, &HM_PT_EXPIRATION_DATE, &HM_PT_DESCR1, &HM_PT_NATIONAL_ID);;
&rsStep(&gridrow_i).MHN_PENDOC_TBL.CLASS_SECTION.Value = &HM_PT_CLASS_SECTION;
&rsStep(&gridrow_i).MHN_PENDOC_TBL.DESCR1.Value = &HM_PT_DESCR;
&rsStep(&gridrow_i).MHN_PENDOC_TBL.DESCR2.Value = &HM_PT_DESCR1;
&rsStep(&gridrow_i).MHN_PENDOC_TBL.EXPIRATION_DATE.Value = &HM_PT_EXPIRATION_DATE;
&rsStep(&gridrow_i).MHN_PENDOC_TBL.NATIONAL_ID.Value = &HM_PT_NATIONAL_ID;
             
End-While;
               &rsStep.DeleteRow(&gridrow_i + 1);

XML Publisher Step by step

  Analyse the Requirement and prepare Target Record with Required fields to Report(do all tthis using in Peoplecode)

Now XMLP Steps will start:
1) We have prepare Query with Target record (Reporting tools > PS Query > Query Manager -- Save).
2) Use this Query and Prepare Data Source (Reporting tools > BI Publisher > Data Source).
    a) Generate XML and XSD
    b) Save xml file to local System
3) Open a new Word Document and use BI-Publisher -  Add-in.
  a) Use Sample XML option to load saved xml on local system.
  b) will get Data load Successfull message.
  c) Now Prepare Template as per Client Requirement
       i) Table wizard - Table - option used to get data in Table Format
      ii) Form to Access the Fields
      iii) Free Form - Will prepare Letter/certificate Templates
  d) save Template name with ".rtf".
4) now upload this template File to Report definition in Template tab and make active status and test Visualise button.
 note: be carefull we have to use same query name
5) Then test using  xml viewer.
__________________________________
Same report to generate using people code

/* !!!!!!!!!!!!!!!!!!!!!!!!!!!!!!!!!!!!!!!!!!!!!!!!!!!!!!!!!!!!!!!!!!!!!!! */
/* People code to Run BI Publisher           */
/* !!!!!!!!!!!!!!!!!!!!!!!!!!!!!!!!!!!!!!!!!!!!!!!!!!!!!!!!!!!!!!!!!!!!!!! */
import PSXP_RPTDEFNMANAGER:*;

Local Record &rcdQryPrompts;
Local string &LanguageCd, &MyTemplate, &MyReportName, &OutFormat, &EMPLID;
Local date &AsOfDate, &BEGIN_DT, &END_DT;

Local Record &rcdSltEmp;
Local string &strEmplids;

Local Rowset &rsSltEmp;


Local Record &REC;


DoSaveNow();

&rsSltEmp = GetLevel0()(1).GetRowset(Scroll.MHN_PENDOC_TBL);
&REC = CreateRecord(Record.MHN_PENDOC_TBL);


   rem TransferPage(Page.LGE_TL_SEC);
   /* !!!!!!!!!!!!!!!!!!!!!!!!!!!!!!!!!!!!!!!!!!!!!!!!!!!!!!!!!!!!!!!!!!!!!!! */
   /* Set XML Publisher report required parameters                            */
   /* !!!!!!!!!!!!!!!!!!!!!!!!!!!!!!!!!!!!!!!!!!!!!!!!!!!!!!!!!!!!!!!!!!!!!!! */
   /**/
   &LanguageCd = "POR";
   &AsOfDate = %Date;
   &OutFormat = "PDF";
   REM &OutFormat = "HTML";

 
      &MyReportName = "MHN_TERM_HM";
      &MyTemplate = "MHN_TERM_HM_1";


   /* !!!!!!!!!!!!!!!!!!!!!!!!!!!!!!!!!!!!!!!!!!!!!!!!!!!!!!!!!!!!!!!!!!!!!!! */
   /* Prompt values                                                           */
   /* !!!!!!!!!!!!!!!!!!!!!!!!!!!!!!!!!!!!!!!!!!!!!!!!!!!!!!!!!!!!!!!!!!!!!!! */
 
   Local PSXP_RPTDEFNMANAGER:ReportDefn &oReportDefn = create PSXP_RPTDEFNMANAGER:ReportDefn(&MyReportName);
   &oReportDefn.Get();
   &rcdQryPrompts = &oReportDefn.GetPSQueryPromptRecord();
 
   If Not &rcdQryPrompts = Null Then
      &oReportDefn.SetPSQueryPromptRecord(&rcdQryPrompts);
      &rcdQryPrompts.OPRID.Value = %OperatorId;
   End-If;

   /* !!!!!!!!!!!!!!!!!!!!!!!!!!!!!!!!!!!!!!!!!!!!!!!!!!!!!!!!!!!!!!!!!!!!!!! */
   /* Kick of the report process                                              */
   /* !!!!!!!!!!!!!!!!!!!!!!!!!!!!!!!!!!!!!!!!!!!!!!!!!!!!!!!!!!!!!!!!!!!!!!! */
 
   &oReportDefn.ProcessReport(&MyTemplate, &LanguageCd, &AsOfDate, &OutFormat);
 
   CommitWork();
 
   /* !!!!!!!!!!!!!!!!!!!!!!!!!!!!!!!!!!!!!!!!!!!!!!!!!!!!!!!!!!!!!!!!!!!!!!! */
   /* Display Report to the user                                              */
   /* !!!!!!!!!!!!!!!!!!!!!!!!!!!!!!!!!!!!!!!!!!!!!!!!!!!!!!!!!!!!!!!!!!!!!!! */
   &oReportDefn.DisplayOutput();
End-If;

Required Field property will not work in Derived work Record.

1) Enable Required fied property in Derived Work Record
2) Place this fied on the Page
3) then open component in PIA and saving the page with out value in the field
4) Page is Saving, not triggering the required field validation.
Reason: Derived Work Record is not a Physical Table so no value is going to save on the database.
i.e. reason Derived work record - Required field will not work so we have to write manual validataion.
Eg: If MHN_PENDDOC_REC.INSTITUTION.Value = "" Then
   /*Error - Por favor selecione o valor Instituição Acadêmica */
   MHN_PENDDOC_REC.INSTITUTION.Style = "PSERROR";
   Error MsgGet(32002, 2, "Message Not Found.");
Else
   MHN_PENDDOC_REC.INSTITUTION.Style = "";
 
end-if;